

ITEMS YOU WILL NEED TO CHANGE SPARK PLUG
- Spark plug with correct gap
- Clean brush & towel
- Spark plug socket 3/8″ or 5/8″
- Protective gloves
- Ratchet
- Phillips & flat screwdriver
- Spark plug gapping set
Before you even start replacing the plug you need to make sure that the power switch on your generator is in the off position and that all power cords are unplugged from it.
Also, if you have run your machine before you have decided to replace your spark plugs, make sure that its surface is not too hot as you could easily burn your skin.
That is why we recommend wearing some protective gloves and glasses.
Once you have done all this, you can proceed to these steps.
STEP 1: LOCATE THE SPARK PLUG
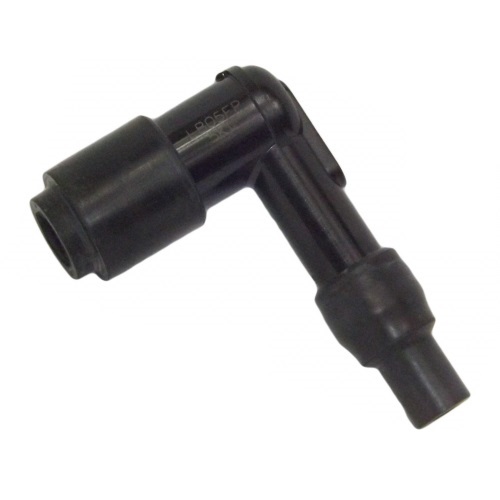
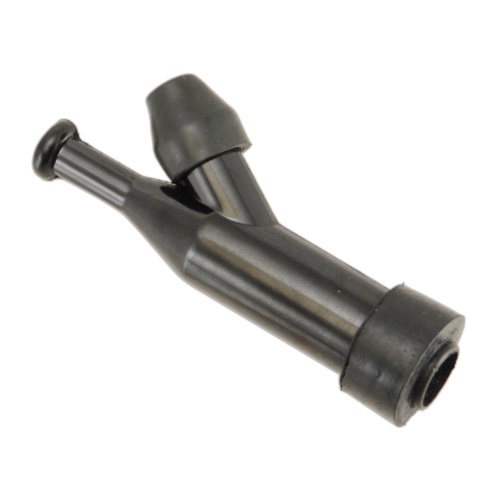
The first step (and often the most complicated, especially if you are doing this for the first time) is to locate the spark plug. Often, it is hidden under a removable casing and is covered by a spark plug boot.
Based on our experience, the easiest way to locate your spark plug is to find and follow a black cable that is connected to the engine and ends with a boot that looks similarly to the images below.
If you have problems locating your spark plug, check out the users manual. It may indicate where it may be hiding and how to get the best access to it. Also, some brands and more powerful models may include more than one spark plug.
That is why you should always check out the instructions manual to your generator.
STEP 2: DISCONNECT PLUG WIRE
Once you have located where your old plug is installed, you need to remove the wire that is connected to it. To safely do so, you need to get access to the boot of a spark plug wire.
Once you get a good access, grab onto that boot firmly, twist it in either direction and pull off at the same time.
This way you will easily break free the wire even if it’s slightly corroded. Rotating motion helps to unclip the connection from the spark plug that will reduce the strain on the wire.
Just never pull the wire portion as you can damage it that way easily.
STEP 3: CLEAN EVERYTHING AROUND
Once you unplug the wire, you need to make sure that the old plug and everything around it is clean. Take your time doing this because if you neglect the cleaning process, you can seriously damage your generator.
How? Once you remove your plug, you will have an opening directly into your engine. If anything gets into it, sooner or later it will damage it.
So make sure you remove and clean any debris, dirt, and oil residue that could fall in.
STEP 4: REMOVE THE OLD PLUG
If everything is clean and you are sure there is nothing that could fall into your engine, you may proceed to the removal of the old plug. You will need a correct spark plug socket and a ratchet.
From our experience, it usually is either a 3/8″ (14 mm) or 5/8″ (16 mm) socket.
Just have a look into the instructions manual you got with your generator. The information should be published there. Once you got the correct socket, you need to attach it onto your spark plug by your hand.
If it’s properly seated on the spark plug, you can attach the ratchet.
Add an extension if needed.
Our recommendation is to use the ratchet only to make the spark plug loose and then remove it. We do rest of the threading/unscrewing by turning the socket manually.
When removing, never change the angle of the socket as this way you will cause damage to your plug.
Once it is out, remove the plug from the socket to make a room for the new one.
STEP 5: CHECK NEW SPARK PLUG
It doesn’t cost too much and is handy.
Thanks to this tool, you can measure the gap between the two electrodes (one straight and one curved) at the tip of your new spark plug.
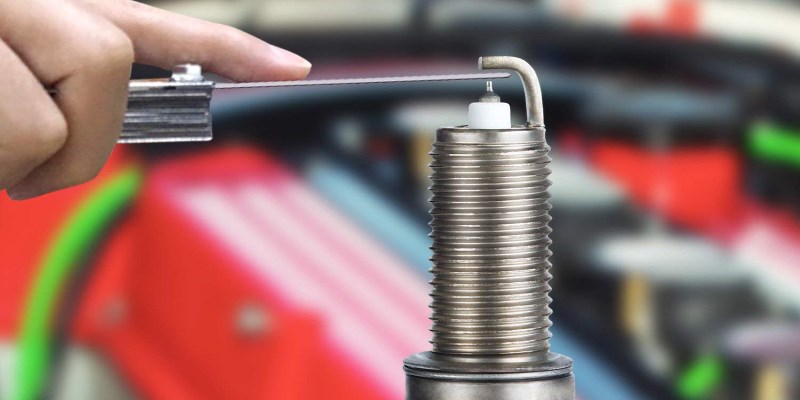
You can do so by placing the feeler gauge into the gap until you can still move it around freely but start to feel a small amount of resistance.
It should not be too loose nor too tight.
Once you have the measurement, compare it with the one from the manual. If it is the same number, then feel free to proceed to the next step.
If you are still not sure you got the correct plug, ask professionals at the local hardware store.
They will gladly help you.
STEP 6: INSTALL NEW PLUG
Once you are sure you got the right gap on your plug, you can install it. Just grab the empty spark plug socket, insert the new plug into it, and place it into the empty socket on your engine.
You can wiggle with it a little bit until it is sitting in the hole properly and start very gently spinning it with your hand.
It should go smoothly and without any resistance.
At this point, it’s easy to cross-thread your plug so be gentle with it and if it gives any resistance, remove it and try reinstalling it again.
If it gives you no resistance, continue spinning it manually until you reach the point where you can’t turn it anymore.
Then, attach a ratchet to the socket and tighten your spark plug. Just pay attention not to overdo it (usually a 1/4 of a turn is enough but this number may vary – see your instructions manual).
Once tightened, you can remove both your ratchet and your spark plug socket.
STEP 7: RECONNECT THE PLUG WIRE
Once you got your new spark plug safely in place, you need to re-connect the wire. Again, grab the boot of the spark plug wire and slide it over the top of the plug. Then, press it until it goes all the way in.
Often, you will either feel or even hear a click from the connector getting into the right position. Once your plug is reconnected, you can reattach any covers you had to take down and you are good to go.
Don’t forget to give your machine a “test run” to see if everything works correctly.