Converting a Microsoft Word document to PDF format is very easy — beginning with Word 2010, Microsoft has included a free PDF conversion tool which allows you to save your documents in PDF format.
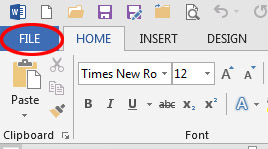
Open your Word Document, and click the “File” Button in the upper left corner.

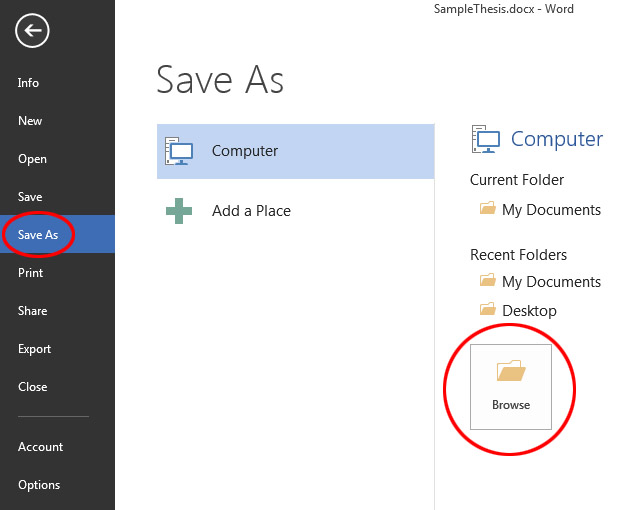
Click the “Save As” button. In Word 2013, you will also need to click the “Browse” button on the “Save As” screen.

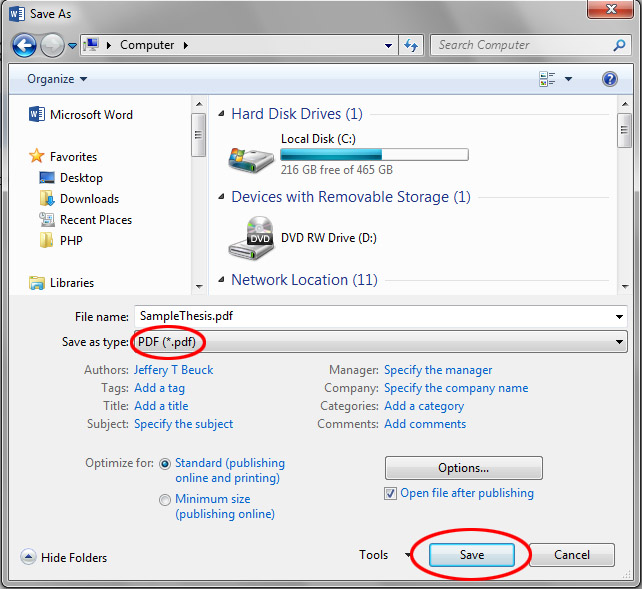
Next to “Save as type:”, select “PDF (*.pdf)”. Then name your file and pay attention to where you are saving it. When you are done, click “Save”.

You can check whether or not the file converted correctly by opening the PDF file with Adobe Reader and reviewing its contents.
Microsoft Word’s built-in PDF converter is generally very good, but always be sure to double-check for formatting changes in your PDF document, and especially check any graphics, illustrations, and tables that were part of your document to make sure they converted properly. In rare instances, you may have to convert lesser-known image formats (for example, those used by proprietary engineering programs) to a more popular format like .tiff or .jpg before doing the conversion to PDF format.
How to convert PDP to Word
You can convert PDF to word document in different ways. Newsclick Nigeria bring you three methods to achieve this
Using Microsoft Word
-
![Image titled Convert a PDF to a Word Document Step 10]() 1Right-click the PDF you want to open. If you’re using a Mac and don’t have a right mouse button, press Control as you click the file. This will open a context menu.
1Right-click the PDF you want to open. If you’re using a Mac and don’t have a right mouse button, press Control as you click the file. This will open a context menu. -
![Image titled Convert a PDF to a Word Document Step 11]() 2Select Open with. It’s near the top of the menu. Another menu will expand.
2Select Open with. It’s near the top of the menu. Another menu will expand. -
![]() 3Click Word or Microsoft Word on the menu. This opens Word and attempts to display the PDF.
3Click Word or Microsoft Word on the menu. This opens Word and attempts to display the PDF. -
![Image titled Convert a PDF to a Word Document Step 13]() 4Click OK to convert the file. Word will convert the file to its own format and display the results. If you’re converting a larger file, it can take a few minutes to complete.
4Click OK to convert the file. Word will convert the file to its own format and display the results. If you’re converting a larger file, it can take a few minutes to complete. -
![Image titled Convert a PDF to a Word Document Step 14]() 5
5Edit the Word document. The converted document may not have perfect page to page correspondence due to line and page breaks, graphics, and other details. Making manual adjustments may be necessary.
- If you downloaded the PDF from the internet, you’ll see a bar at the top of the document asking if you want enable editing. Click Enable Editing so you can make changes to the file.
-
![]() 6
6Save the converted PDF. Once you’re ready to save the converted file as its own Word document, do the following:
- Windows — Click File, click Save As, click This PC, enter a file name, select a save location on the left side of the window, and click Save.
- Mac — Click File, click Save As, enter a name, select a file location, and click Save.
Using Google Docs
-
![Image titled Convert a PDF to a Word Document Step 1]() 1
1Go to https://docs.google.com in your computer’s web browser. This will open your Google Docs page if you’re logged into your Google Account.
- If you aren’t logged in, enter your email address and password when prompted. You may first have to click Go to Google Docs in the middle of the page.
- One caveat of using Google Docs to convert your PDF is that Google Docs will not preserve any of the PDF’s photos.
-
![]() 2
2 -
![]() 3Click the Upload tab. It’s at the top of the “Open a file” window.
3Click the Upload tab. It’s at the top of the “Open a file” window. -
![Image titled Convert a PDF to a Word Document Step 4]() 4Click Select a file from your device. It’s the blue button in the center of the window.
4Click Select a file from your device. It’s the blue button in the center of the window. -
![]() 5Select your PDF file and click Open. This uploads the PDF file to your Google Drive and opens a preview once it has finished uploading
5Select your PDF file and click Open. This uploads the PDF file to your Google Drive and opens a preview once it has finished uploading -
![]() 6
6Click the Open with menu. It’s at the top-center part of the window.
- If you don’t see the Open with drop-down box, move your mouse to the top of the window.
-
![]() 7
7Click Google Docs on the menu. This opens the PDF in Google Docs.
- If you don’t see Google Docs as an option in the drop-down menu, you can add it: click Connect more apps in the drop-down menu, search for google docs, and Install to get it.
-
![]() 8
8Save the PDF as a Word document. Now that you’ve opened the document in Docs, you can save it as a Microsoft Word file and download it to your computer. Here’s how:
- Click File in the upper-left side of the Google Docs page.
- Select Download.
- Click Microsoft Word (.docx) as the format.
- Select a save location and/or click Save if prompted.
Using Adobe Acrobat DC Pro
-
![Image titled Convert a PDF to a Word Document Step 15]() 1Open Adobe Acrobat DC Pro. If you have the paid version of Adobe Acrobat, you can use it to convert your PDF to a Word document. You’ll find this app in your Windows Start menu or your Mac’s Applications folder.
1Open Adobe Acrobat DC Pro. If you have the paid version of Adobe Acrobat, you can use it to convert your PDF to a Word document. You’ll find this app in your Windows Start menu or your Mac’s Applications folder. -
![Image titled Convert a PDF to a Word Document Step 10]() 2
2Right-click the PDF you want to open. If you have Adobe Acrobat Pro (the paid version of Acrobat), you can use it to convert a PDF to a Word document. Right-clicking the file on your computer will open a context menu.
- If you’re using a Mac and don’t have a right mouse button, press Control as you click the file instead.
-
![Image titled Convert a PDF to a Word Document Step 17]() 3Select Open with. It’s near the top of the menu. Another menu will expand.
3Select Open with. It’s near the top of the menu. Another menu will expand. -
![Image titled Convert a PDF to a Word Document Step 18]() 4Select Adobe Acrobat Pro or Adobe Acrobat Pro DC. This opens the PDF in Acrobat Pro.
4Select Adobe Acrobat Pro or Adobe Acrobat Pro DC. This opens the PDF in Acrobat Pro. -
![Image titled Convert a PDF to a Word Document Step 19]() 5Click Export PDF. This tool is in the right panel. A list of file types will expand.
5Click Export PDF. This tool is in the right panel. A list of file types will expand. -
![Image titled Convert a PDF to a Word Document Step 20]() 6Click Microsoft Word as the export format. Additional options will expand.[7]
6Click Microsoft Word as the export format. Additional options will expand.[7] -
![Image titled Convert a PDF to a Word Document Step 21]() 7Click Word Document. It’s the first option on the right panel.[8]This tells Acrobat what type of document to create.
7Click Word Document. It’s the first option on the right panel.[8]This tells Acrobat what type of document to create. -
![Image titled Convert a PDF to a Word Document Step 22]() 8Click Export. Acrobat will now convert the file and prompt you to name it.[9]
8Click Export. Acrobat will now convert the file and prompt you to name it.[9] -
![Image titled Convert a PDF to a Word Document Step 23]() 9Name the file and click Save. Now that you’ve saved the PDF as a Word document, you can open and edit in in Microsoft Word.
9Name the file and click Save. Now that you’ve saved the PDF as a Word document, you can open and edit in in Microsoft Word.


